


While we are preparing for the Second Guild Wars 2 Beta Weekend, I believe that most of you are planning strategies for World vs. World battles. If you didn’t have a chance to participate in the previous Beta Weekend these tactics will help you to keep pace with other players.
Basic Information
- Getting into World vs. World:
Open the Hero panel (H), choose the Hero tab, and select “Be in the Mists”. In the next area, run to the portal in front of you to warp to the Hall of Memories. From there, take the Asura Gate leading into WvW, west of the Asura Gate to Lion’s Arch.
Every Home City also has a Portal to Lion’s Arch. There are gates to different WvW borderlands in the south (Fort Marriner). -
- Killing an enemy player in WvW will result in experience and loot drops. Loot is randomly generated; the defeated player does not actually lose anything through being defeated.
- Power of the Mists is awarded to players in PvE and WvW based on the war score of their home world. It include bonuses to health, gathering and crafting among others.
- Try to learn as much as possible about Siege Weapons
- At any given time there are 16 world vs. world battles in progress, as there are 48 worlds.
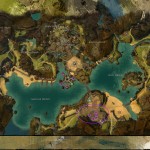
- World vs. World Map


Advance Information
- Supply is everything:
The most valuable thing you can do in WvW as an individual is related to supply: Carry supply, generate supply (by taking camps), defend supply, defend siege, kill enemies’ siege, kill enemies’ supply carriers. - Never ever leave supply in an objective you are about to lose, as it transfers to the attacker. You should use it to upgrade, build defensive siege (both stationary and recipe), or if all else fails just to repair the wall/door being attacked to delay defeat.
- Never commit to an attack on a defended position without holding supply. In the case of larger objectives, make sure clear supply lines are available – you’ll need to send small groups back to recollect as they use their supply.
- Split your forces:
It may be fun for a while to have your entire guild/alliance all in a giant ball rolling over every objective you encounter but when you face someone who’s splitting forces you’ll be losing the war even if you win all your battles. - Use the number of people and supply that is exactly necessary to win. Anything extra should be sent to another objective / map. Don’t forget to account for taking/holding supply lines and stopping reinforcements.
- Don’t try to take objectives without siege equipment (especially Stonemist). Siege equipment dramatically speeds up the time it takes to bash down defenses.
- Don’t attack a keep without first taking and holding the camps that feed it. If it’s well defended, it will be crucial to drain its supply to zero asap.
- If you’re defending a keep or tower, don’t just stand around and wait for the enemy to come crashing through the gates. Check up on the walls—there could be cannons, mortars, and pots of boiling oil just waiting to be used on the enemy! You don’t have to buy blueprints for these stationary keep weapons, but you will need to have supply available to build them.
- Take advantage of the game system:
Right now, there isn’t a notification system when an objective is attacked, cross map. But assuming there will be one, have a handful of people who’s job it is to send distraction signals by attacking objectives far from your actual target. - Enemies cannot waypoint to an objective under attack. Know exactly what is required to put something under attack and allocate resources to doing so on any objectives near your target. Make life hard for reinforcing defenders.
- Don’t go anywhere near a place with legendary defenders. They can and WILL one shot kill entire groups of people and they are invulnerable. Make sure you don’t get baited by another team into a death trap.
- Don’t forgot to loot bodies of players too! They do in fact drop items from time to time and one of these items in the WvW currency called “Badges of Honor”. These can be traded for weapons at certain vendors but you’re going to need a few hundred for the good stuff (roughly 500-600).
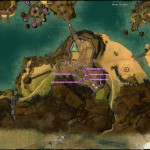
- Know the details of the ‘mini-dungeon’ in the center map. This will be a very interesting aspect of that map and it should be carefully considered how players will use it in order to advance your own interests.
One of the coolest things that we’ve added to WvW recently is a persistent mini-dungeon that can be accessed through the three keeps in the center map. This area is designed with multiplayer PvP in mind and players can do things like activate the traps in the mini-dungeon to defeat enemy players. Of course, at the end of the area there’s a chest full of rewards.
Source: MMO Reviews
- Carefully consider whether you should waypoint after dying. Remember, everyone can res, and everyone in your area gets a map marker showing your position. If your enemy is smart, they’ll be cutting off your most desirable waypoints, and you don’t want to do a long run.
- Small folds in the ground can keep you out of visual from an enemy group even if you’re right next to them
- Chat:
Use the team chat! Local chat is in fact visible to the the enemy if you are close enough to them. - Try not to die.
Everyone seems to be having the same complaint about no waypoints on the WvW map other than the handful of areas that are protected from other factions. Every objective on the map has an NPC named Quartermaster [Upgrades] that can let you upgrade their respective area for a chunk of cash. Waypoints ARE IN FACT one of the upgrades you can get for keeps, Stonemist, and towers but you need to get the prerequisite upgrades fist. 150 silver is the total cost of the 3 upgrades needed to get a waypoint. You don’t spend that entire chunk at once.
Tips for different Professions
- Aoe skills, even offensive skills can only affect five people maximum
- Many professions have mass resurrects, clipping areas (Guardian), and push/launches. While these are “nice” in PvE/PvP, they’re incredible in WvW.
- Mesmer can portal to and from resources points to build parts of a keep faster.
- Mesmer has elite skill “Mass Invisibility” (You and all allies gain Stealth for a 5 sec.) that makes everyone invisible (not sure does it work!)
- Warrior can mass stun a group attacking the door with hammer.
- Necromancer & thief can pull people off walls. (For thieves: utility skill Scorpion Wire, but to pull someone off, he has to be very close to the edge of the wall.)
- Engineer with mortar & Ranger with longbow can out range people on walls forcing them to come down if they don’t have siege.
- There’s also the fact that thief can shadowstep onto walls
Restrictions:
- Players who have recently changed their home world are restricted from entering WvW for a limited time.
- Players who are idle for a certain amount of time will be automatically removed from WvW, but can rejoin at any time.
- Players who attempt to join a map that is full can decide whether to queue for a space, or join one of the other maps instead.
Sources:
okuRaku @ reddit – World v World Strategy
okuRaku @ reddit – Eternal Battlegrounds HQ Panorama
IrishKing @ reddit – A few things about WvW people need to know
Guild Wars 2 Wiki – World versus World
okuRaku @ reddit – World v World Strategy
okuRaku @ reddit – Eternal Battlegrounds HQ Panorama
IrishKing @ reddit – A few things about WvW people need to know
Guild Wars 2 Wiki – World versus World
Awesome guide! Really helps out my guildmates that couldnt play in the BWEs
A single player can now impact the WvW if they are careful. Working the mercenary camps doing turn ins can be a fun activity to get xp. Watching the Ogres come storming down from their camp is a fun event to watch. Also escorting or attacking supply trains can enable 2-3 players to impact the supply flow.